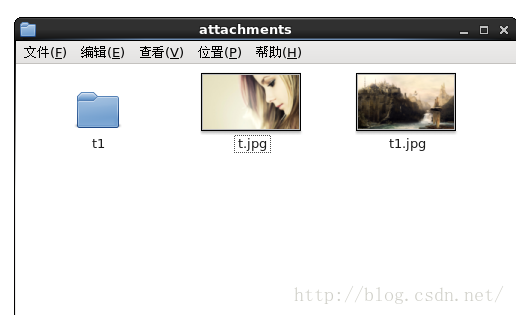
Linux 服务器 Lsyncd 技术 同步备份 rsync + lsyncd 文件实时同步/备份 2017-10-10 17:19 3285 更新于 2017-10-10 17:19 rsync 可实现文件的同步/备份,安装配置移步[linux 下 rsync 备份/同步文件](/article/5 "linux 下 rsync 备份/同步文件") lsyncd 实现了触发式或定时通知事件,可以近实时的同步文件(封装了rsync),github地址:https://github.com/axkibe/lsyncd 系统:centos6.4 主服务器:192.168.1.136 同步服务器:192.168.1.137 在 192.168.1.136 上安装 lsyncd 安装依赖(lsyncd 使用 lua 语言写的) ``` yum install lua lua-devel ``` 在github 上下载 lsyncd-master.zip ``` unzip lsyncd-master.zip cd lsyncd-master cmake -DCMAKE_INSTALL_PREFIX=/usr/local/lsyncd make && make install ``` 创建配置文件 ``` cd /usr/local/lsyncd/ mkdir ./etc mkdir ./var vi etc/lsyncd.conf ``` 内容为( -- 是 lua 中的注释符) ```lua -- 全局配置 settings { -- 日志文件存放位置 logfile ="/usr/local/lsyncd/var/lsyncd.log", -- 状态文件存放位置 statusFile ="/usr/local/lsyncd/var/lsyncd.status", -- 将lsyncd的状态写入上面的statusFile的间隔,默认10秒 --statusInterval = 10 -- 是否启用守护模式,默认 true --nodaemon=true -- inotify监控的事件 ,默认是 CloseWrite,还可以是 Modify 或 CloseWrite or Modify inotifyMode = "CloseWrite", -- 最大同步进程 maxProcesses = 8, --累计到多少所监控的事件激活一次同步,即使后面的delay延迟时间还未到 --maxDelays = 1 } -- 远程目录同步 sync { -- rsync , rsyncssh , direct 三种模式 default.rsync, -- 同步的源目录,使用绝对路径。 source = "/home/wwwroot/attachments", -- 定义目的地址.对应不同的模式有几种写法,这里使用远程同步的地址,rsync中的地址 target = "rsync137@192.168.1.137::rsyncd", -- 默认 true ,允许同步删除。还有 false, startup, running 值 --delete = true, -- 哪些文件不同步 exclude = { ".*" }, -- 累计事件,等待rsync同步延时时间,默认15秒,最大累计到1000个不可合并的事件(1000个文件变动), delay = 15, -- 默认 true 当init = false ,只同步进程启动以后发生改动事件的文件,原有的目录即使有差异也不会同步 --init = true, -- rsync 的配置 rsync = { -- rsync 的二进制处理文件 binary = "/usr/bin/rsync", -- 归档模式 archive = true, -- 压缩传输 compress = true, -- 增量 verbose = true, -- 密码文件 password_file = "/etc/rsyncd.pwd", -- 其他 rsync 的配置参数, 限速(--bwlimit KBPS),使用 rsync -v 查看详细参数 -- _extra = {"--bwlimit=200"} } } ``` 更多详细配置,请看文档 https://github.com/axkibe/lsyncd/wiki/Lsyncd%202.1.x%20%E2%80%96%20The%20Configuration%20File 创建密码文件(内容为192.168.1.137 上用户‘rsync137’对应的密码 123456) ``` vim /etc/rsyncd.pwd chmod 600 /etc/rsyncd.pwd ``` 将 lsyncd 加入到环境目录(做个软链) ``` ln -s /usr/local/lsyncd/bin/lsyncd /usr/bin/lsyncd ``` 在192.168.1.137安装配置 rsync 配置可简单点 ``` uid = root gid = root hosts allow = 192.168.1.136 use chroot = no # 最大链接数 max connections = 10 # pid文件的存放 pid file = /etc/rsyncd/rsyncd.pid # max connections 参数的锁文件的存放位置 lock file = /etc/rsyncd/rsync.lock # 模块名 自定义 [rsyncd] path = /home/wwwroot/attachments ignore errors = true # 这里要允许写入 read only = false list = no auth users = rsync137 # 指定认证文件 secrets file = /etc/rsyncd/rsyncd.secrets strict modes = true ``` 认证文件内容为(/etc/rsyncd/rsyncd.secrets) rsync137:123456 启动 lsyncd ``` lsyncd -log Exec /usr/local/lsyncd/etc/lsyncd.conf ``` 测试 192.168.1.136 上创建了一个t1的文件夹,和上传了张 t1.jpg图片 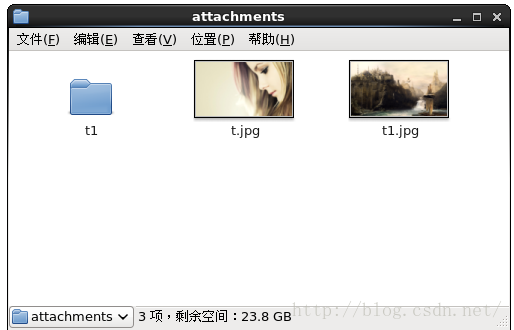 还未同步时(配置的15秒延迟),192.168.1.137 上结构如下图 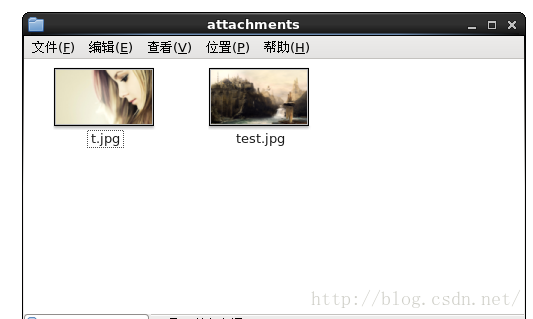 同步后如下