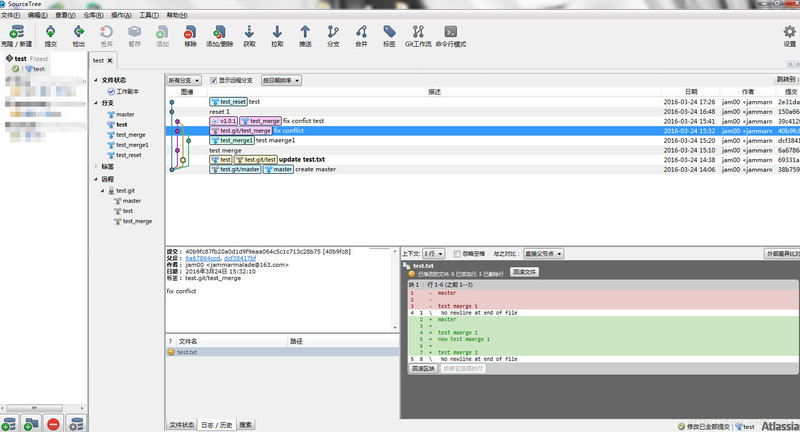
Git 版本管理 技术 Git 仓库的创建和常用命令的使用 2017-10-19 18:16 2969 更新于 2017-10-19 18:16 Git是一款免费、开源的分布式版本控制系统 更多理论知识请查看官方中文文档 https://git-scm.com/book/zh/v2/ 说明: git> 表示该语句是运行在git 的命令行终端 ## 一、安装 linux:直接 yum install git windows:下载 [Git2.5.2-64](https://download.csdn.net/download/jam00/9472306 "Git2.5.2-64"),点击安装 ## 二、创建本地仓库 打开 git-bash,f:\test 目录可以是空目录也可以是已存在项目的目录 ``` git> cd f:\test git> git init ``` 配置全局参数(将 name 和 email@email.com 改成你自己的名称和emall) ``` git> git config --global user.name "name" git> git config --global user.email "email@example.com" ``` 生成密钥和公钥(等会要用) ``` git> ssh-keygen -t rsa -C "email@example.com" ``` 一直回车,若你不想在使用密钥时输入口令,将其留空即可 会在用户主目录下(C:\Users\用户\.ssh)生成一个 .ssh 的目录, 此时,你就可以使用git了,更改,提交等等操作,但是这些操作都是在本地的 ## 三、创建远程仓库 远程仓库在linux 下,ip 为 192.168.1.136(linux 虚拟机) 假设已安装了 Git ### 1、创建管理运行git 的用户 ``` adduser git ``` 此时会生成目录 /home/git 若没有请自行创建 这里创建一个叫 test.git 的仓库(一般裸仓库以.git结尾),--bare 为裸仓库,不存放原文文件 ``` cd /home/git git init --bare test.git chown -R git:git /home/git/ ``` 禁止 git 用户 ssh 登录 ``` vim /etc/passwd git:x:505:505::/home/git:/usr/bin/git-shell ``` 保存并退出 ### 2、创建ssh 验证文件 ``` mkdir /home/git/.ssh/ ls -ahl vim /home/git/.ssh/authorized_keys ``` 将刚才生成的公钥(C:\Users\用户\.ssh\id_rsa.pub)里面的内容,复制到authorized_keys,若是以后有其他人加入,就一行一个 你也可以用ftp下载`authorized_keys`文件,修改后再上传上去 此时,远程仓库就创建好了 ## 四、常用命令使用 继续使用刚才打开的 git-bash,现在我们默认是在master分支 ### 1、 添加远程仓库(就是刚才建立的裸仓库) git remote add [远程仓库别名] [远程仓库地址] ``` git> git remote add test.git git@192.168.1.136:/home/git/test.git ``` ### 2、查看远程仓库 -v 显示出远程链接 ``` git> git remote -v test.git git@192.168.1.136:/home/git/test.git (fetch) test.git git@192.168.1.136:/home/git/test.git (push) ``` 查看更多的远程仓库信息 ``` git> git remote show test.git ``` ### 3、远程仓库重命名 git remote rename [旧名] [新名] ``` git> git remote rename test.git newtest.git ``` git remote 查看一下 ### 4、远程仓库移除 ``` git> git remote rm newtest.git ``` 现在你就可以用 test.git 这个别名来做拉取和推送等和远程仓库相关的操作了 在 test 文件夹下 添加一个 test.txt 的文件,并写入一行 ‘master’ ### 5、 提交你的更改 ``` # 缓存更改(可多次执行) git> git add . # 提交更改 -m '描述' ,描述一下这个分支都干了些啥(很有用处) git> git commit -m 'create master' # 推送到远程仓库(这样别人才能看见你的更改,当然他要先拉取一下) # git push [远程仓库别名] [要推送的本地分支名] git> git push test.git master ``` 现在远程仓库就有一个基础版本了,别人加入你的项目时,他只需要 git clone [远程仓库名] 就行了 ### 6、 创建、查看、切换、删除分支 创建一个 test 分支并切换到 test 分支 git checkout -b [新分支名称] ;checkout 是切换,-b 是创建 ``` git> git checkout -b test ``` 也可以使用 branch 创建 ``` git> git branch test1 ``` 查看分支列表 -v 查看每个分支最后一次提交的信息 ``` git> git branch -v master 38b7597 create master * test 69331a3 test1 dcf3841 ``` *代表现在所在的那一个分支 切换分支 ``` git> git checkout test ``` 删除分支 -d 是删除;若是有改动,会删除失败,试试 -D 吧,但不建议这么做 ``` git> git branch -d test1 ``` ### 7、查看更改 改动 test.txt 的内容,添加一行 ‘add test’(在git bash 中可以直接用 vim 操作 test.txt 哦,和linux下操作一样) 看看都改动了哪些文件 ``` git> git status ``` 看看 test.txt 改动的内容 ``` git> git diff test.txt ``` 查看完毕后就可以提交更改了 ### 8、拉取分支 pull 会自动合并 git pull [远程仓库里别名] [分支名称] ``` git> git pull test.git master ``` 若不想直接合并,使用 fetch git fetch [远程仓库里别名] [分支名称] ``` git> git fetch test.git test ``` 它会拉取远程仓库的 test 分支到本地,你可以查看改动后,手动合并 ### 9、合并分支 使用场景: 1、本地仓库有多个个分支,合并到一个分支,推送合并的那个分支到远程仓库即可 2、多个人同时在一个分支下工作,你在此分支上的工作完成后,要先从远程仓库拉取新的改动,合并后再推送到远程仓库 创建两个测试分支 ``` git> git checkout -b test_merge # 在 test.txt 中添加一行 test maerge 1 (记住行号,比如第三行) ,提交更改 git> git add . git> git commit -m 'test merge' # 创建另一个分支 ,并添加一行 ,将上个分支添加的那一行(第三行)更改为 new test maerge 1,并新添一行 test maerge 2 git> git checkout master git> git checkout -b test_merge1 git> git add . git> git commit -m 'test merge1' # 切换到 test_merge 进行合并 git> git checkout test_merge git> git merge test_merge1 ``` 若是合并远程仓库的分支,要先 fetch 更新到本地,再合并,这里演示合并远程的 test 分支 ``` git> git fetch test.git test git> git merge test.git/test ``` 自动合并时报错,有冲突,test.txt 的内容为 ``` master <<<<<<< HEAD test maerge 1 ======= new test maerge 1 test maerge 2 >>>>>>> test_merge1 ``` HEAD 表示当前分支的数据 ======= 到 test_merge1 里面的内容是 test_merge1 分支添加的内容 这时就要手动更改了,改为如下 ``` master test maerge 1 new test maerge 1 test maerge 2 ``` 改完后要重新提交 ``` git> git add . git> git commit -m 'fix conflict' git> git push test.git test_merge ``` ### 10、回退 创建一个 test_reset 分支,更改 test.txt 文件三次并提交三次 ``` git> git checkout -b test_reset # 第一次提交 test.txt 里面的内容改为 reset 1 git> git add . git> git commit -m 'reset 1' # 第二次提交 test.txt 里面的内容改为 reset 2 git> git add . git> git commit -m 'reset 2' # 第三次提交 test.txt 里面的内容改为 reset 3 git> git add . git> git commit -m 'reset 3' ``` 是用 git log 查看日志 **--pretty** 显示格式,也可以是 --oneline **--abbrev-commit** 仅显示SHA-1的前几个字符(已是唯一),而非所有的40个字符 ``` git> git log --pretty=oneline --abbrev-commit a415c64 reset 3 a2c427a reset 2 150a66e reset 1 ``` 前7个字符就是我们每次提交的 commit id,它是唯一的(其实是有40位,不过7位就足够了);后面是提交时的描述,这时描述就起作用了,现在可以回退到任意提交点 回退到 reset 1 查看一下 test.txt 里面的内容(内容为: reset 1) ``` git> git reset --hard 150a66e ``` 也可以执行 git reset --hard 回退到最近一次的提交点 看看我们刚才都执行了哪些操作 ``` git> git reflog 150a66e HEAD@{0}: reset: moving to 150a66e a415c64 HEAD@{1}: commit: reset 3 a2c427a HEAD@{2}: commit: reset 2 150a66e HEAD@{3}: commit: reset 1 ... ``` 可以看出,我们回退,并没有生成新的 commit id ,只是将 HEAD 指向了原来的commit id HEAD 是一个指向当前分支的指针,可以理解成这是 git 内部对当前分支的别名 可以使用如下命令查看 HEAD 指向 ``` git> git log --oneline --decorate 39c412f (HEAD -> test_merge) fix confict test 40b9fc8 (test.git/test_merge) fix conflict dcf3841 (test_merge1) test maerge1 6a67864 test merge 69331a3 (test.git/test, test) update test.txt 38b7597 (test.git/master, master) create master ``` ### 11、 git log 图形查看提交历史、各个分支的指向以及项目的分支分叉情况 ``` git> git log --oneline --decorate --graph --all * 2e31daa (test_reset) test * 150a66e reset 1 | * 39c412f (HEAD -> test_merge, tag: v1.0.1) fix confict test | |\ | | * 69331a3 (test.git/test, test) update test.txt | |/ |/| | * 40b9fc8 (test.git/test_merge) fix conflict | |\ | | * dcf3841 (test_merge1) test maerge1 | |/ |/| | * 6a67864 test merge |/ * 38b7597 (test.git/master, master) create master ``` ### 12、标签的创建、查看、删除 创建(轻量标签) ``` git> git tag v1.0.0 ``` 针对某一提交打标签 ``` # git tag -a [指定标签名] -m [指定描述] [提交的唯一id] git> git tag -a v1.0.1 -m "version 1.0.1" 39c412f ``` 这种也叫 `附注标签`,会记录打标签者的信息、打标签的日期时间、附注信息,然后显示具体的提交信息 轻量标签本质上是将提交校验和存储到一个文件中 - 没有保存任何其他信息 查看标签 查看某一系列标签 ``` git> git tag -l 'v1*' ``` 查看标签的详细信息 ``` git> git show v1.0.1 ``` 推送到远程仓库 ``` git> git push test.git v1.0.1 ``` 推送所有标签 ``` git> git push test.git --tags ``` 删除标签 ``` git> git tag -d v1.0.0 ``` 删除远程仓库的标签 ``` git> git push test.git :refs/tags/v1.0.1 ``` ### 13、换行模式 windows 使用回车和换行两个字符来结束一行 CRLF Linux 只使用换行一个字符 LF 若add 时出现类似这样的错误 fatal: LF would be replaced by CRLF fatal: CRLF would be replaced by LF 尝试打开或关闭 autocrlf 来解决 ``` git> git config --global core.autocrlf [true|false] ``` ### 14、打包两提交点之间的变更文件,并归档 git archive -o [归档文件名] HEAD $(git diff --name-only [开始点] [结束点]) -o --output git diff --name-only [开始点] [结束点] ;显示两点之间更改过的文件名 ``` git> git archive -o latest.zip HEAD $(git diff --name-only 38b7597 2e31daa) ``` ## 五、Git 图形化管理工具 为了提高工作效率,图形化的管理工具也是必不可少的,当然,git命令烂熟于心的同学也不见得效率有多低 虽然git 有提供一个简单的 Git GUI,但是不怎么好用啊,还丑... 这里有各种各样免费的图形化管理工具 https://git-scm.com/downloads/guis 这里介绍一下我用的这个吧 SourceTree 可在这里免费下载 SourceTree1.5 安装好后,只需注册一下,就可免费使用,界面清爽,改动一目了然 界面如下